
Showing posts with label In the Kitchen. Show all posts
Showing posts with label In the Kitchen. Show all posts
Wednesday, November 21, 2012
Wednesday, October 03, 2012
In the Kitchen: Upside Down Pear Cake
There are not a lot of foods that I don't enjoy. And funnily enough, pears is one of them. I just can not take the texture of them. I want to like them, but then I bite into one and gag. Can't do it.
So this fall being the smart lady that I am, I got a case of pears. And my family just wasn't eating them fast enough. (Maybe since I got a case of nectarines and 2 of peaches at the same time.....) Anyways, I was needing to use up some pears. And I wanted to it in a way that I'd enjoy too. (And I'd already canned my limit for the year..... my self imposed limit that is).
This dessert is a result of all these circumstances. :)
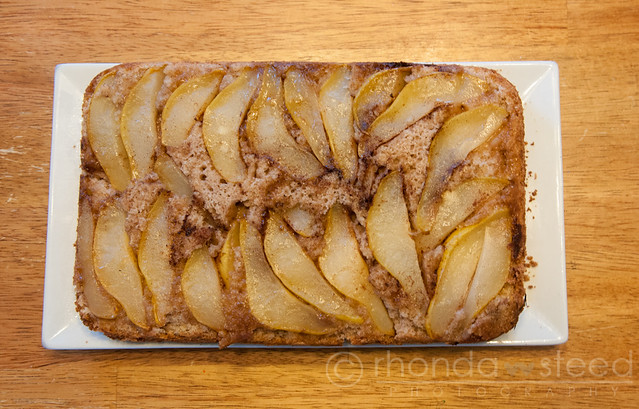
Upside Down Pear Cake
2 ripe pears
2 Tbsp Brown Sugar
2 tsp + 1 tsp cinnamon
1/2 cup butter
1 cup sugar
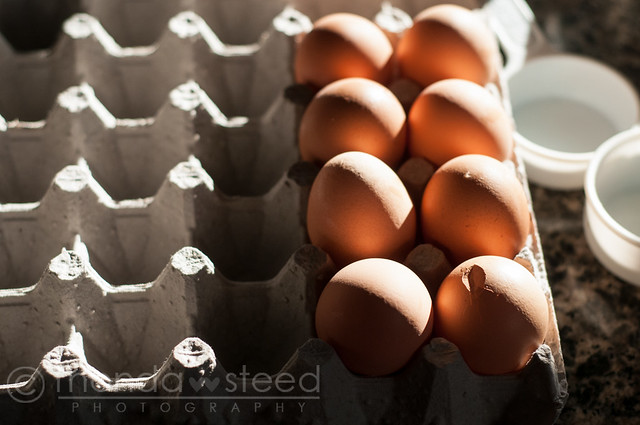
2 eggs
1 1/2 cup flour
1 tsp baking powder
1/2 tsp salt
1/2 cup sour cream
1. Grease a 2 quart glass pan. Peel your pears and cut into slices and layer into the bottom of the pan. Sprinkle the brown sugar and 2 tsp cinnamon over top of the pears.
2. Sift together flour, baking powder, salt and cinnamon. Set aside.
3. In a separate bowl, cream butter and sugar in a mixing bowl. Add eggs, one at a time, beating well after each one.
4. Add the flour mixture alternately with the sour cream, starting and ending with the flour.
5. Bake in a preheated 350 degree oven for 25 - 30 minutes or until the top is golden brown.
6. Eat it warm with ice cream or vanilla bean whipped cream or let it cool to room temperature.


 And here
So this fall being the smart lady that I am, I got a case of pears. And my family just wasn't eating them fast enough. (Maybe since I got a case of nectarines and 2 of peaches at the same time.....) Anyways, I was needing to use up some pears. And I wanted to it in a way that I'd enjoy too. (And I'd already canned my limit for the year..... my self imposed limit that is).
This dessert is a result of all these circumstances. :)
Upside Down Pear Cake
2 ripe pears
2 Tbsp Brown Sugar
2 tsp + 1 tsp cinnamon
1/2 cup butter
1 cup sugar
2 eggs
1 1/2 cup flour
1 tsp baking powder
1/2 tsp salt
1/2 cup sour cream
1. Grease a 2 quart glass pan. Peel your pears and cut into slices and layer into the bottom of the pan. Sprinkle the brown sugar and 2 tsp cinnamon over top of the pears.
2. Sift together flour, baking powder, salt and cinnamon. Set aside.
3. In a separate bowl, cream butter and sugar in a mixing bowl. Add eggs, one at a time, beating well after each one.
4. Add the flour mixture alternately with the sour cream, starting and ending with the flour.
5. Bake in a preheated 350 degree oven for 25 - 30 minutes or until the top is golden brown.
6. Eat it warm with ice cream or vanilla bean whipped cream or let it cool to room temperature.
And here
Thursday, September 20, 2012
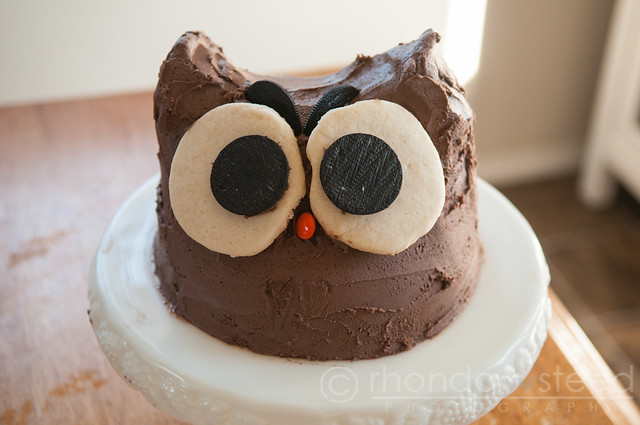
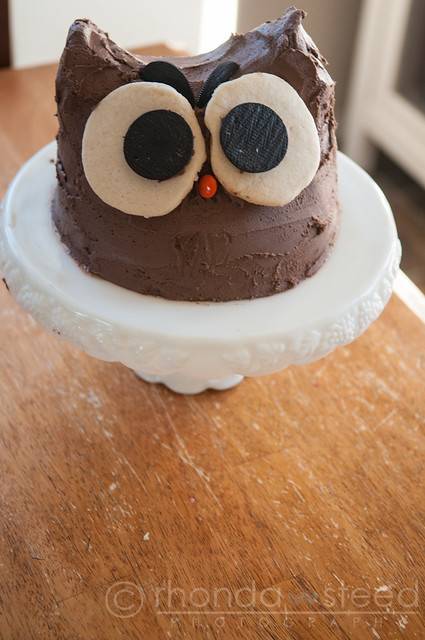
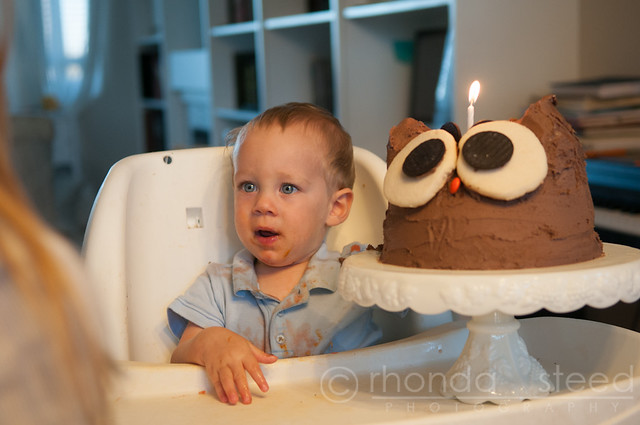
Oliver's B-Day Party
We had a pretty low key party for little Oliver. With family. It was just right. But I did want to show you how I made his Owl cake. Am I a tad bit obsessed with owls and Oliver? Perhaps. When I get every thing done in his room you will see how true that really is (eek).
Anywho, here is the cake.
To make it... this is what I came up with.
First I used my dome cake pan (that is actually for Barbie dress cakes)
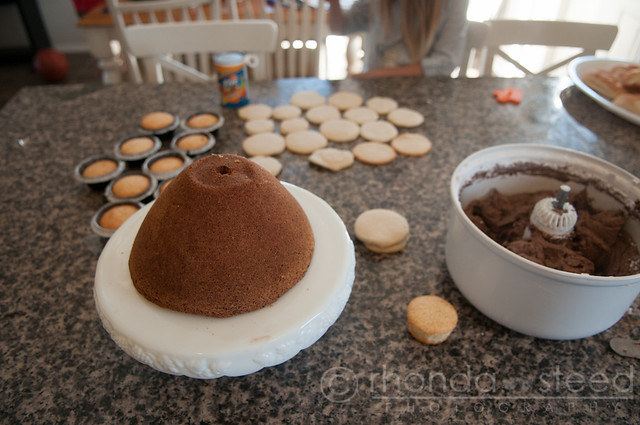
And made a stack of sugar cookie circles to use....
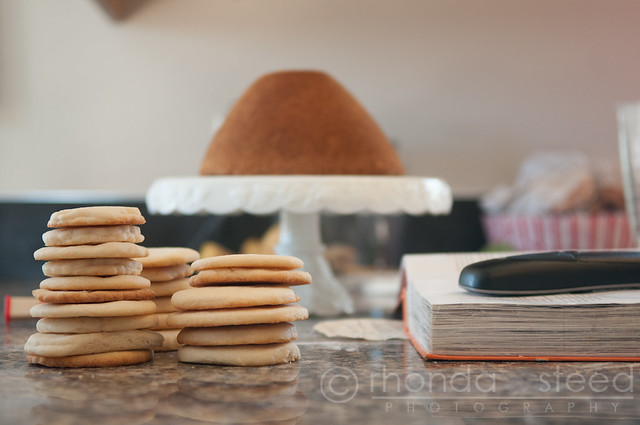
And cupcakes. (Now the cupcakes and the cake are all from the same batch that I made from Martha Stewarts Baking Handbook (which if you've read my blog for a while you know I love!) It's called the Yellow Cake.)
I cooled them all. And made my icing (made a chocolate buttercream.)
First added two cupcakes on the top of the cake. I added a wooden skewer in each just to make sure it was steady.
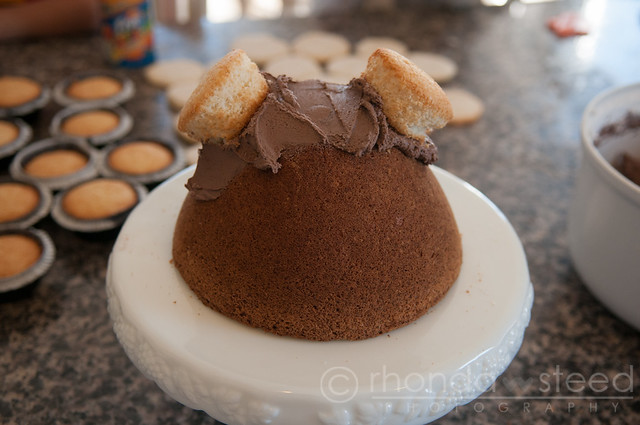
Then covered the whole thing in icing - making the parts at the top a little pointy with the icing.
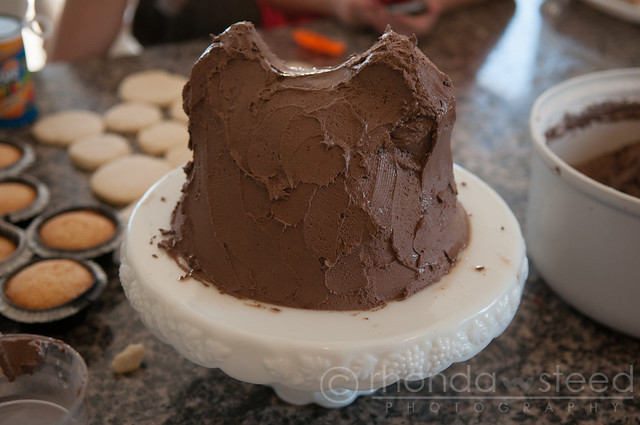
Let that dry a bit then smoothed out the icing more. And added the cookie eyes.
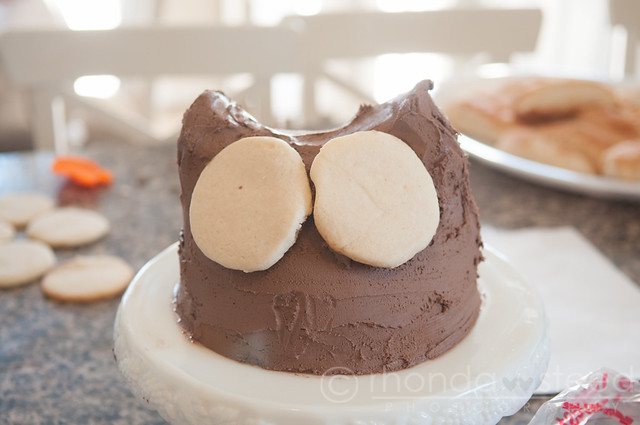
Then added some Oreo halves for the eyes, some broken Oreo halves for the eyebrows and one small orange smartie for the beak.
I decorated the rest of the cupcakes too....
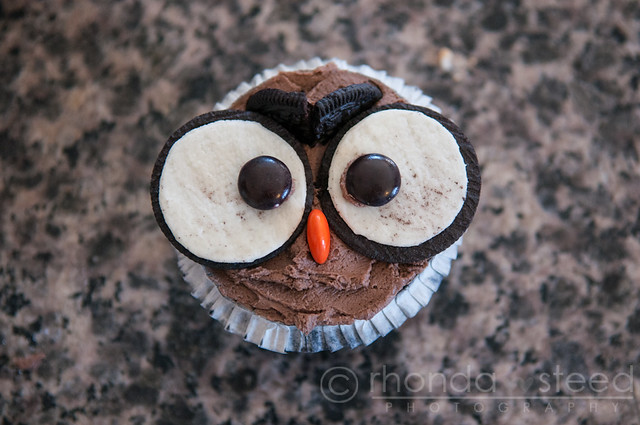
A little flock of owls....
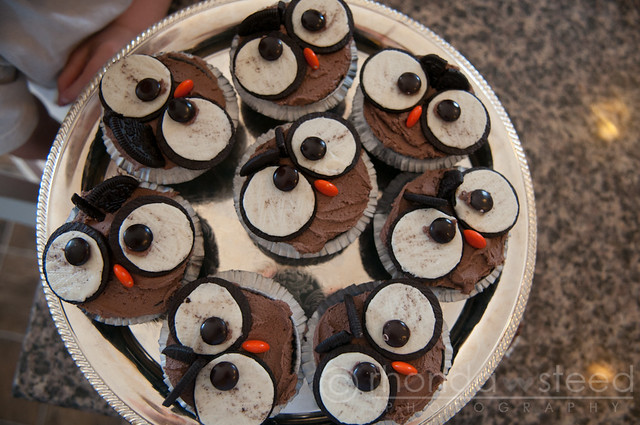
All the treats together (had to ice the rest of the cookies too!)
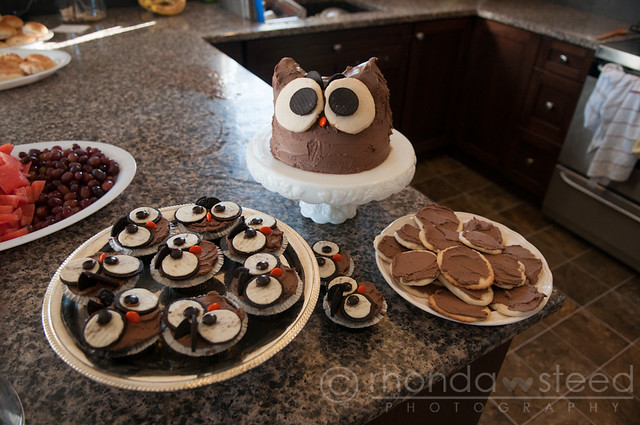
And here is Oliver with his cake... which he touched twice and then cried to be done :)
I'm linking this up here

Anywho, here is the cake.
To make it... this is what I came up with.
First I used my dome cake pan (that is actually for Barbie dress cakes)
And made a stack of sugar cookie circles to use....
And cupcakes. (Now the cupcakes and the cake are all from the same batch that I made from Martha Stewarts Baking Handbook (which if you've read my blog for a while you know I love!) It's called the Yellow Cake.)
I cooled them all. And made my icing (made a chocolate buttercream.)
First added two cupcakes on the top of the cake. I added a wooden skewer in each just to make sure it was steady.
Then covered the whole thing in icing - making the parts at the top a little pointy with the icing.
Let that dry a bit then smoothed out the icing more. And added the cookie eyes.
Then added some Oreo halves for the eyes, some broken Oreo halves for the eyebrows and one small orange smartie for the beak.
I decorated the rest of the cupcakes too....
A little flock of owls....
All the treats together (had to ice the rest of the cookies too!)
And here is Oliver with his cake... which he touched twice and then cried to be done :)
I'm linking this up here
Monday, September 10, 2012
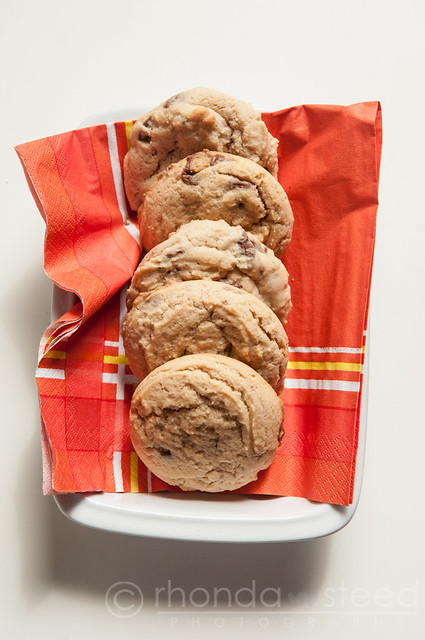
In the Kitchen: Reese Mini Cookies
One of my very favorite treats are Reese Peanut Butter Cups. And then I found Reese Minis. And I love them even more!!
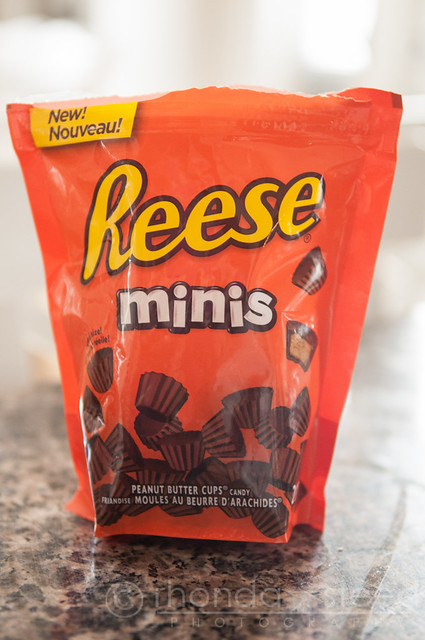
And the last bag I was enjoying made me think how great they'd be in cookies. So I got to work and came up with these little gems.
Reese Mini Cookies
1/2 cup softened margarine
1/2 cup packed brown sugar
1/2 cup white sugar
2 eggs
1/2 cup smooth peanut butter
1/2 tsp salt
1 tsp baking soda
2 cups all purpose flour
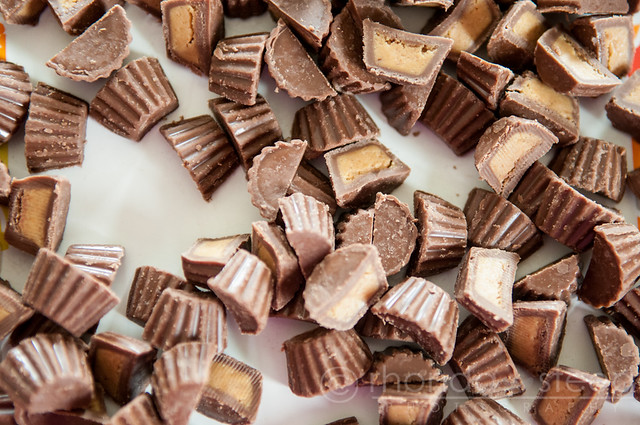
1 bag of Reese Minis
1. Dump out all your Reese Minis and chop them in half. Spread them out onto a plate or pan and pop them into the freezer for 15-20 minutes.
2. Meanwhile, Cream butter and sugars until light and fluffy. Add eggs one at a time, beating well after each. Add in salt, soda and flour and mix well.
3. Add in your frozen chopped Reese Minis and mix but not too much as it'll chop them all up and you don't want to do that :)
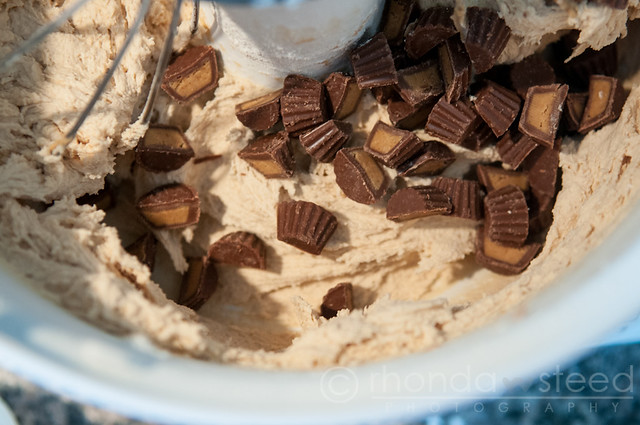
4. With an ice cream scoop, scoop out the cookies onto a pan prepared with parchment paper. The slip the pans into the freezer for about 10 minutes. Bake in a preheated oven for 12 minutes. Enjoy!!
(When you see this little logo in the future, that means it's a recipe I came up with myself.)
And the last bag I was enjoying made me think how great they'd be in cookies. So I got to work and came up with these little gems.
Reese Mini Cookies
1/2 cup softened margarine
1/2 cup packed brown sugar
1/2 cup white sugar
2 eggs
1/2 cup smooth peanut butter
1/2 tsp salt
1 tsp baking soda
2 cups all purpose flour
1 bag of Reese Minis
1. Dump out all your Reese Minis and chop them in half. Spread them out onto a plate or pan and pop them into the freezer for 15-20 minutes.
2. Meanwhile, Cream butter and sugars until light and fluffy. Add eggs one at a time, beating well after each. Add in salt, soda and flour and mix well.
3. Add in your frozen chopped Reese Minis and mix but not too much as it'll chop them all up and you don't want to do that :)
4. With an ice cream scoop, scoop out the cookies onto a pan prepared with parchment paper. The slip the pans into the freezer for about 10 minutes. Bake in a preheated oven for 12 minutes. Enjoy!!
(When you see this little logo in the future, that means it's a recipe I came up with myself.)
Wednesday, September 05, 2012
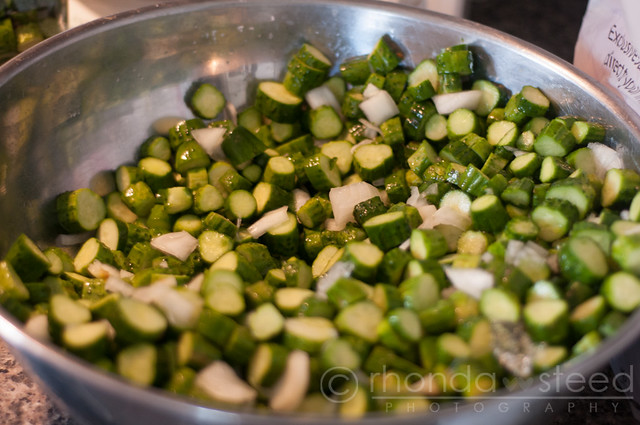
In the Kitchen: Dixie's Bread & Butter Pickles
One of the stories my mother looooves to tell about my childhood is about how every year in her canning she would do cases of these pickles and every year we would eat every jar. I can't even begin to tell you how many times I have hear her say it. And for all the times she's said it, I really have no recollection of them specifically. Just her canning. A LOT.
This year a nice Hutterite man stopped by my house and wanted to sell me some pickling cucumbers. So I agreed (although Regan told me to be careful... hahaha). So when I called my mom she was SURE I had to make these. After all "every year in her canning she would do cases of these pickles and every year we would eat every jar."....
Dixie's (My Mommma's) Bread and Butter Pickles
Ingredients:
• 4 pounds pickling cucumbers
• 1 large onion, quartered, sliced about 1/4-inch thickness
• 1/3 cup kosher salt
• 3 cups cider vinegar
• 1 1/2 cups sugar
• 1 teaspoon ground turmeric
• 1/2 teaspoon celery seeds
• 2 teaspoons yellow mustard seeds, or use half pickling spices
• 1/4 teaspoon red pepper flakes, optional

Preparation:
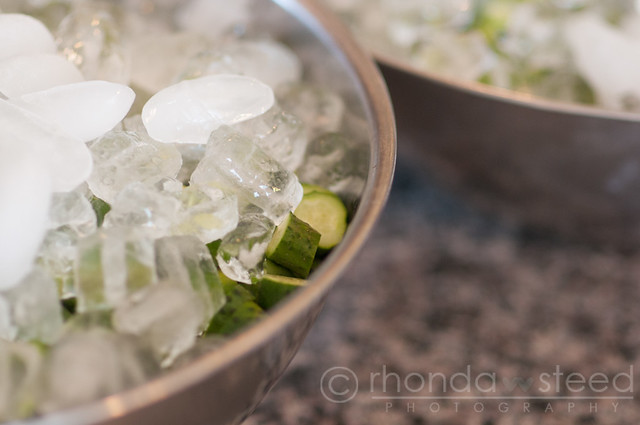
Wash cucumbers and cut off the ends. Slice crosswise into 1/8-inch slices. Toss in a large bowl with the salt and onion slices;
Cover with about 4 to 6 cups of ice cubes. Cover and let stand for 4 hours or refrigerate overnight.
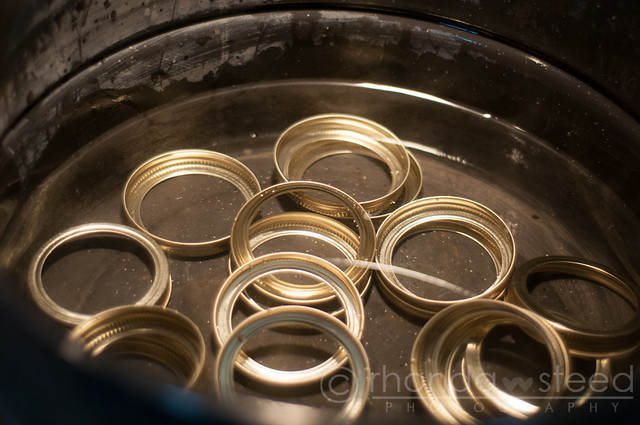
Prepare the boiling water bath. Add water to a large caner with rack and heat to about 180°. The water should be high enough to be at least 1 inch above the filled jars. I usually fill it about halfway and I keep a kettle or saucepan of water boiling on another burner to add to the canner as needed. Wash jars thoroughly and heat water in a small saucepan; put the lids in the saucepan and bring almost to the boil; lower heat to very low to keep the lids hot.
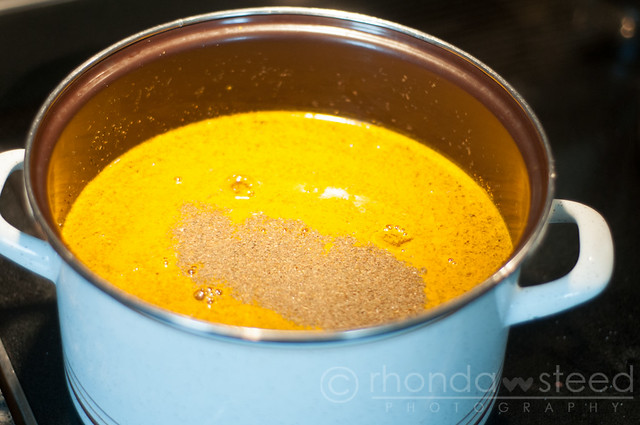
Drain the cucumber mixture. In a large pot (nonreactive) over medium heat, combine the remaining ingredients and bring to a boil.
Add the drained cucumber mixture and bring to a boil. With a slotted spoon, loosely pack the vegetables in prepared jars.
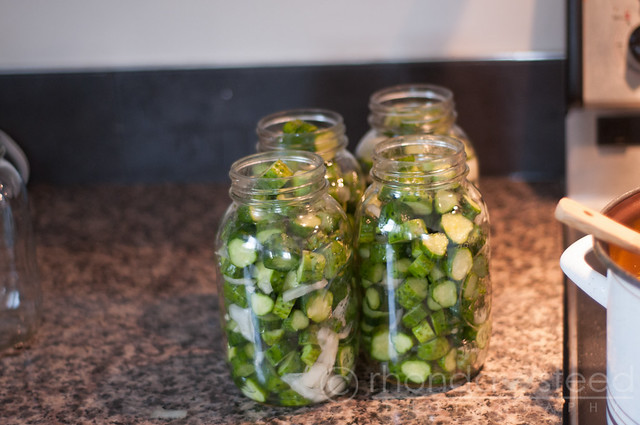
Ladle the liquid into jars, dividing evenly among the jars.

With a clean damp cloth (I keep a little bowl or cup of the boiled water handy for this step), wipe away any drips around the rims of the jars then cover with 2-piece jar lids. A lid lifter comes in handy to get the flat lids out of the water, or you could use tongs. Adjust the screw on rings firmly but do not over-tighten. Place filled in the prepared boiling water bath, adding more hot water as needed to bring the water up to about 1 inch above the jars. Bring the water to a boil. Cover and continue boiling for 10 minutes. Lift the jars out of the water and place on a rack to cool.
Makes about 6 pints.
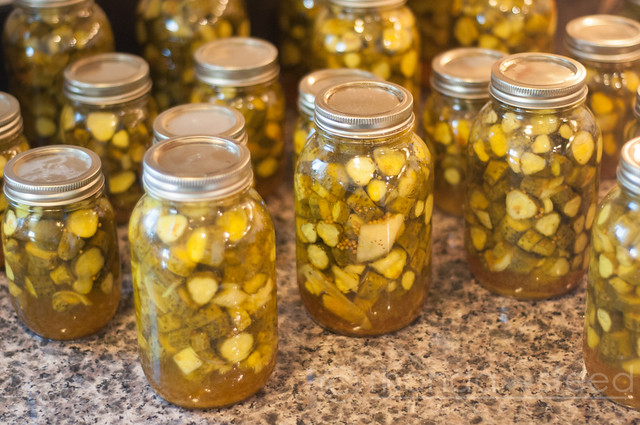
That's it. I did more than 6 pints :).
And now hopefully MY kids will eat them all and I will start telling THEM about how every year I made piles of these pickles and every year they ate them all up.
This year a nice Hutterite man stopped by my house and wanted to sell me some pickling cucumbers. So I agreed (although Regan told me to be careful... hahaha). So when I called my mom she was SURE I had to make these. After all "every year in her canning she would do cases of these pickles and every year we would eat every jar."....
Dixie's (My Mommma's) Bread and Butter Pickles
Ingredients:
• 4 pounds pickling cucumbers
• 1 large onion, quartered, sliced about 1/4-inch thickness
• 1/3 cup kosher salt
• 3 cups cider vinegar
• 1 1/2 cups sugar
• 1 teaspoon ground turmeric
• 1/2 teaspoon celery seeds
• 2 teaspoons yellow mustard seeds, or use half pickling spices
• 1/4 teaspoon red pepper flakes, optional
Preparation:
Wash cucumbers and cut off the ends. Slice crosswise into 1/8-inch slices. Toss in a large bowl with the salt and onion slices;
Cover with about 4 to 6 cups of ice cubes. Cover and let stand for 4 hours or refrigerate overnight.
Prepare the boiling water bath. Add water to a large caner with rack and heat to about 180°. The water should be high enough to be at least 1 inch above the filled jars. I usually fill it about halfway and I keep a kettle or saucepan of water boiling on another burner to add to the canner as needed. Wash jars thoroughly and heat water in a small saucepan; put the lids in the saucepan and bring almost to the boil; lower heat to very low to keep the lids hot.
Drain the cucumber mixture. In a large pot (nonreactive) over medium heat, combine the remaining ingredients and bring to a boil.
Add the drained cucumber mixture and bring to a boil. With a slotted spoon, loosely pack the vegetables in prepared jars.
Ladle the liquid into jars, dividing evenly among the jars.
With a clean damp cloth (I keep a little bowl or cup of the boiled water handy for this step), wipe away any drips around the rims of the jars then cover with 2-piece jar lids. A lid lifter comes in handy to get the flat lids out of the water, or you could use tongs. Adjust the screw on rings firmly but do not over-tighten. Place filled in the prepared boiling water bath, adding more hot water as needed to bring the water up to about 1 inch above the jars. Bring the water to a boil. Cover and continue boiling for 10 minutes. Lift the jars out of the water and place on a rack to cool.
Makes about 6 pints.
That's it. I did more than 6 pints :).
And now hopefully MY kids will eat them all and I will start telling THEM about how every year I made piles of these pickles and every year they ate them all up.
Monday, August 13, 2012
In the kitchen: Strawberry Bread
This fabulous recipe is from my friend Jill.
 She is SUCH a good cook. And so funny. Always lots of laughs to be had with Jill around!!! I am sure I will probably share some other recipes Jill has shared with me on here!
Jill's Strawberry Bread
3 cups all-purpose flour
1 tsp salt
2 cup sugar
1 tsp cinnamon
1 tsp baking soda
4 eggs, beaten
1 1/4 cup canola oil
2 1/2 cup strawberries, chopped (can use fresh or frozen. If using frozen, thaw and drain beforehand)
Mix flour, salt, sugar, cinnamon, and baking soda in large bowl. Make a well in centre. In a separate bowl, mix eggs canola oil and the strawberries.
Add into well in centre of flour mix. Combine but not overmix. Grease and sugar two loaf pans, coating the inside. Bake at 350 for 1 hr. (I always sprinkle tops of loaves with sugar before baking to make it crunchy)
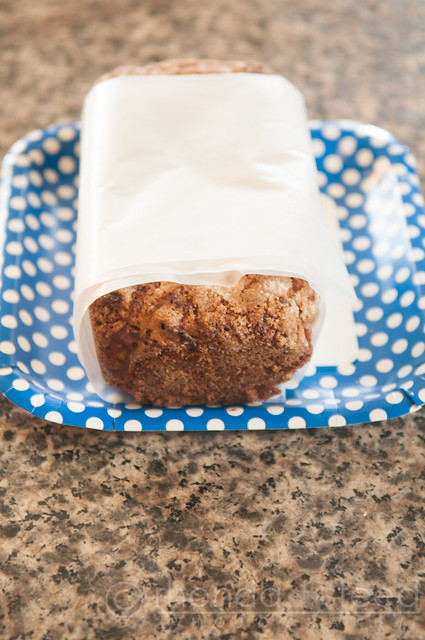
I made this a couple weeks ago and I didn't have any strawberries, frozen or fresh. But I did have some of these freeze dried strawberries from Thrive.
 And they worked really well. I ended up letting them sit in water first and then draining them. And I added more like 3 1/2 cups. But worked out so good! So if you have
Thrive products in your home try some of those in this bread!
Enjoy!!

Jill's Strawberry Bread
3 cups all-purpose flour
1 tsp salt
2 cup sugar
1 tsp cinnamon
1 tsp baking soda
4 eggs, beaten
1 1/4 cup canola oil
2 1/2 cup strawberries, chopped (can use fresh or frozen. If using frozen, thaw and drain beforehand)
Mix flour, salt, sugar, cinnamon, and baking soda in large bowl. Make a well in centre. In a separate bowl, mix eggs canola oil and the strawberries.
Add into well in centre of flour mix. Combine but not overmix. Grease and sugar two loaf pans, coating the inside. Bake at 350 for 1 hr. (I always sprinkle tops of loaves with sugar before baking to make it crunchy)
I made this a couple weeks ago and I didn't have any strawberries, frozen or fresh. But I did have some of these freeze dried strawberries from Thrive.

Thrive products in your home try some of those in this bread!
Enjoy!!
Monday, July 23, 2012
In the Kitchen: Rhubarb Sourcream Pie
This GREAT recipe is from my friend Lonnie. I told her to email me a picture and this is what she sent me.... her kids view of her....

:) Lonnie is a crack up. And SUCH A good cook! She is in Dinner Club with me.
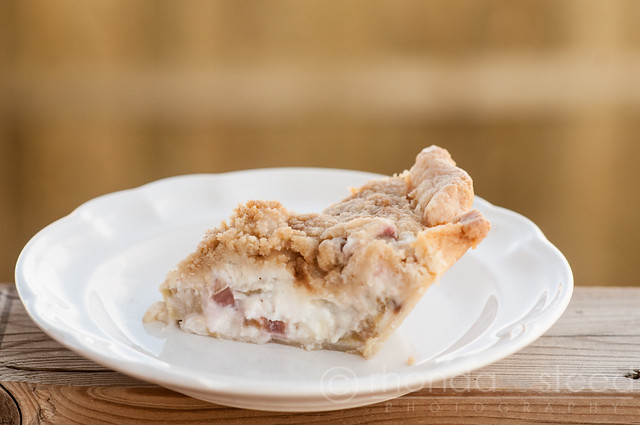
Anywho, on to the PIE! Over two years ago Lonnie brought me one of these pies. And I fell in love with it! SO GOOD!
4 cups rhubarb
your favorite pie crust
1 cup sugar
1 cup sourcream
1/3 cup flour
1/2 cup flour
1/2 cup butter
1/2 cup brown sugar
1.Ppreheat oven to 425 degrees. Roll out your pastry and put it in your pan. Fill with your rhubarb. Mix together the sour cream, sugar and 1/3 cup flour and pour over top the rhubarb.
2. Cut together the 1/2 cup flour, butter and brown sugar and sprinkle over top the pie.
3. Bake on bottom shelf for 10 minutes at 425 and then reduce heat to 350 and bake for 40-50 minutes until rhubarb is cooked and the top is brown.
Enjoy!

:) Lonnie is a crack up. And SUCH A good cook! She is in Dinner Club with me.
Anywho, on to the PIE! Over two years ago Lonnie brought me one of these pies. And I fell in love with it! SO GOOD!
4 cups rhubarb
your favorite pie crust
1 cup sugar
1 cup sourcream
1/3 cup flour
1/2 cup flour
1/2 cup butter
1/2 cup brown sugar
1.Ppreheat oven to 425 degrees. Roll out your pastry and put it in your pan. Fill with your rhubarb. Mix together the sour cream, sugar and 1/3 cup flour and pour over top the rhubarb.
2. Cut together the 1/2 cup flour, butter and brown sugar and sprinkle over top the pie.
3. Bake on bottom shelf for 10 minutes at 425 and then reduce heat to 350 and bake for 40-50 minutes until rhubarb is cooked and the top is brown.
Enjoy!
Monday, May 28, 2012
In the Kitchen: Double Chocolate Brownie Cookies
Did you know that some of the BEST recipes come from the packaging? Those recipes are tested and retested. And because of that you can trust those recipes. This one comes from the Hershey's Chipits White Chocolate Chips.
The first time I made these Alden was beyond excited about them. The next few times I made different cookies he kept asking why I didn't make this kind again. He loooves them. And so do I!
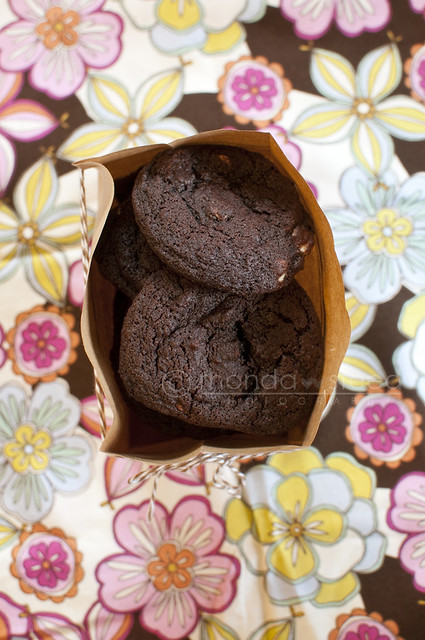
1 1/3 cups softened butter
1 cup packed brown sugar
2/3 cup granulated sugar
2 eggs
1 1/2 tsp vanilla
2 1/4 cups all-purpose flour
2/3 cup cocoa
1 tsp baking soda
1/2 tsp salt
3 Tbsp milk
1 pkg Hershey's Chipits White Chocolate Chips

Bakers Twine from Sweet Estelle
Cream butter, brown sugar and white sugar. Beat in eggs and vanilla. Combine flour, cocoa, soda and salt. Blend into creamed mixture alternatively with milk. Stir in white chocolate chips/ Drop dough by tablespoonfuls onto an ungreased cookie sheet. Bake at 350 degrees for 10 to 12 minutes. Makes about 4 1/2 dozen cookies.
The first time I made these Alden was beyond excited about them. The next few times I made different cookies he kept asking why I didn't make this kind again. He loooves them. And so do I!
1 1/3 cups softened butter
1 cup packed brown sugar
2/3 cup granulated sugar
2 eggs
1 1/2 tsp vanilla
2 1/4 cups all-purpose flour
2/3 cup cocoa
1 tsp baking soda
1/2 tsp salt
3 Tbsp milk
1 pkg Hershey's Chipits White Chocolate Chips
Bakers Twine from Sweet Estelle
Cream butter, brown sugar and white sugar. Beat in eggs and vanilla. Combine flour, cocoa, soda and salt. Blend into creamed mixture alternatively with milk. Stir in white chocolate chips/ Drop dough by tablespoonfuls onto an ungreased cookie sheet. Bake at 350 degrees for 10 to 12 minutes. Makes about 4 1/2 dozen cookies.
Wednesday, May 09, 2012
In the Kitchen: Orange Cookies
Isn't it funny how tasting or smelling something will bring us smack back in a memory. I am positive you have food smells and tastes that make you think of someone or a different time.
These are a flashback from my childhood. My mom baked a lot and these were one of the top choices. I love that they are so different from chocolate chip, love the orange icing and the softness in them. So tasty!
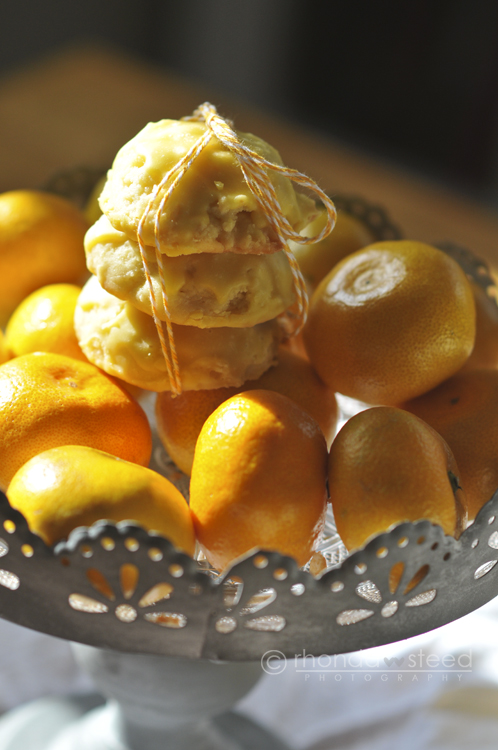
Cake platter from the Home Port and bakers twine from sweet estelle
Ingredients
2 cups white sugar
1 cup shortening
2 eggs
1 cup sour cream
1 teaspoon vanilla extract
5 cups all-purpose flour
2 teaspoons baking powder
1 teaspoon baking soda
1 teaspoon salt
3/4 cup frozen orange juice concentrate, thawed
2 tablespoons grated orange zest
1/2 teaspoon grated orange zest
2 tablespoons frozen orange juice concentrate, thawed
1 teaspoon vanilla extract
4 tablespoons butter, melted
1 1/2 cups confectioners' sugar
1.Cream white sugar and shortening; add eggs and stir. Add sour cream and 1 teaspoon vanilla; stir and set aside. Sift together flour, baking powder, baking soda, and salt. Add little by little to the creamed mixture and stir well. Add 3/4 cup orange juice concentrate, and 2 tablespoons orange zest. Drop onto greased cookie sheets by teaspoonfuls.
2. Bake at 375 degrees F (190 degrees C) for about 10 minutes. Frost cookies when they are cool.
To Make Frosting: Mix together 1/2 teaspoon orange zest, 2 Tablespoons of the thawed orange juice concentrate, 1 teaspoon vanilla, 4 Tablespoons of melted butter, 1 1/2 cups confectioners' sugar or enough to make frosting of spreading consistency.
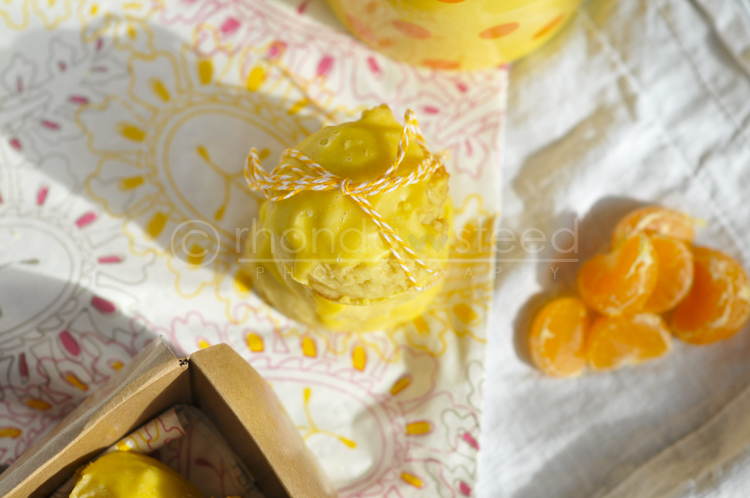
Bakers twine from sweet estelle , Cloth white napkins from Pier One, Paper Napkin from Superstore, and cute cardboard box from Le Box Boutique
Enjoy!!!
These are a flashback from my childhood. My mom baked a lot and these were one of the top choices. I love that they are so different from chocolate chip, love the orange icing and the softness in them. So tasty!
Cake platter from the Home Port and bakers twine from sweet estelle
Ingredients
2 cups white sugar
1 cup shortening
2 eggs
1 cup sour cream
1 teaspoon vanilla extract
5 cups all-purpose flour
2 teaspoons baking powder
1 teaspoon baking soda
1 teaspoon salt
3/4 cup frozen orange juice concentrate, thawed
2 tablespoons grated orange zest
1/2 teaspoon grated orange zest
2 tablespoons frozen orange juice concentrate, thawed
1 teaspoon vanilla extract
4 tablespoons butter, melted
1 1/2 cups confectioners' sugar
1.Cream white sugar and shortening; add eggs and stir. Add sour cream and 1 teaspoon vanilla; stir and set aside. Sift together flour, baking powder, baking soda, and salt. Add little by little to the creamed mixture and stir well. Add 3/4 cup orange juice concentrate, and 2 tablespoons orange zest. Drop onto greased cookie sheets by teaspoonfuls.
2. Bake at 375 degrees F (190 degrees C) for about 10 minutes. Frost cookies when they are cool.
To Make Frosting: Mix together 1/2 teaspoon orange zest, 2 Tablespoons of the thawed orange juice concentrate, 1 teaspoon vanilla, 4 Tablespoons of melted butter, 1 1/2 cups confectioners' sugar or enough to make frosting of spreading consistency.
Bakers twine from sweet estelle , Cloth white napkins from Pier One, Paper Napkin from Superstore, and cute cardboard box from Le Box Boutique
Enjoy!!!
Wednesday, May 02, 2012
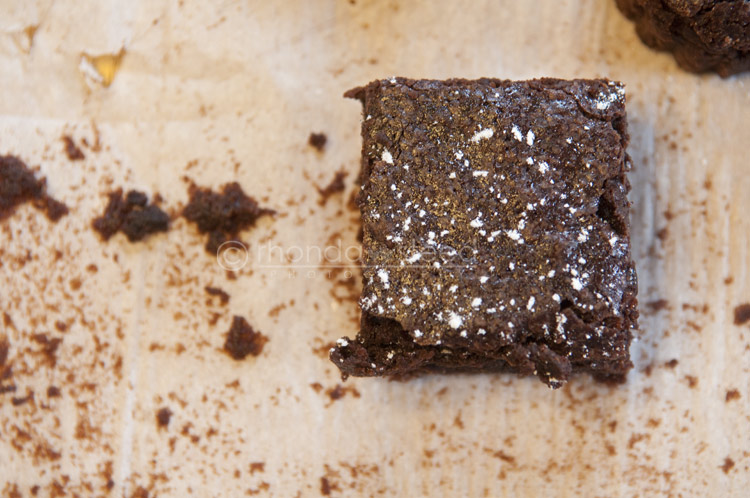
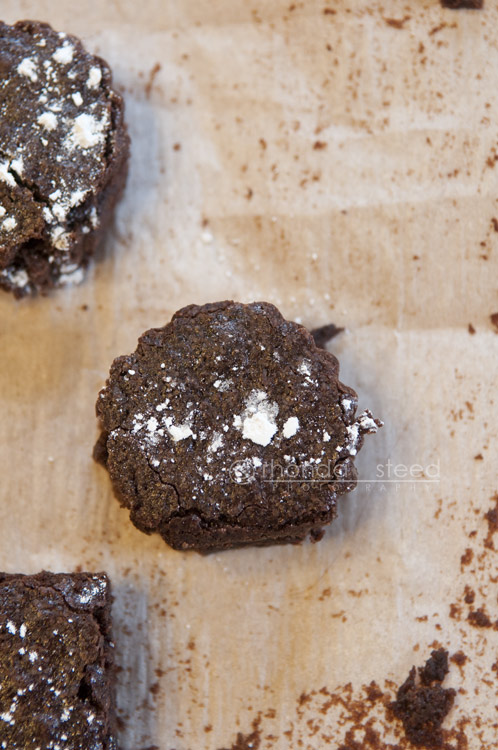
In the kitchen: Disgustingly Rich Brownies
You know how sometimes people will stop eating a dessert and say, "Too rich for me, can't finish it?" That does NOT make sense to me. Hello it's dessert. The rich sugary delight of dessert. On a side note....every time I write dessert I think two s' cause you want more dessert - instead of desert when you wouldn't want seconds...
I have never met a dessert too rich. Nope. Ever. Love them all. Yum. I've met some I didn't like. But really not to many of those either.
And I happen to think Brownies are one of the best kinds of desserts around. And such a great thing to learn to bake. If you are afraid of baking (don't get that either...) or always screw up everything you bake, try these. Easy peasy. And hello.... they are called Disgustingly Rich Brownies. Translated that means perfect brownies.
I got these from my friend Alysha's family cookbook and adjusted (made it easier) it a tad.
1 cup butter
2 cups sugar
3/4 cup cocoa
4 eggs
1 tsp vanilla
1 1/4 cup flour
1/4 tsp salt
Preheat oven to 350 degrees. Grease a pan (9x13) or just cover it with parchment paper (easier clean up!). Melt butter in microwave. Add sugar and cocoa and mix well. Add eggs and mix well. Add flour and salt, mixing just until smooth (don't mix too much). Add 1/2 cup chopped nuts if you want them. Spread in greased (or lined) pan, making an even batter. Bake at 350 until brownies start to pull away from the sides or when no batter sticks to a toothpick stuck in the middle.
I like to double the recipe and then cook it on a cookie sheet so they are thin. And they are perfect if you wanted to use cookie cutters and make them into shapes. (why would you do that?? In case you wanted to add a dob of carmel and then some chocolate mousse on top to make a REALLY yummy treat!)
OR just have them with ice cream and some butterscotch topping. Yum.
OR just eat them warm out of the oven.
OR just eat them all broken up on a chocolate sundae.
Or all of the above ;)
Wednesday, April 25, 2012
In the Kitchen: Banana Cupcakes
Two Sundays ago after we got home from church Lucy came into the kitchen and announced that we HAD to make some cupcakes. It was two people's birthdays that she heard in Primary and we had to take them some treats. The two people are leaders - one in the Primary Presidency and the other a teacher - not her teacher. A different one.
Regan was on call, Eli had had a hard day and I was tired frankly. But she wanted to so badly. So we made some. And the kids watched me decorate them with the lovely Honey Cinnamon Frosting. They figured out how all three of them could have a beater (two with a beater each and one with a spoon. Lucy drew and wrote on a card for each of them and we all piled in the van. The first house no one was home so I just opened the door and set them inside (this is Raymond!) and the next house the kids (except Oliver :) ) all ran up and delivered them. They were all so happy to have done it.
Obviously them getting to eat the left over cupcakes that day and in their lunches the next couple days sweetened the deal. But what made me the most happy, and I think them too (especially Lucy), is that they did some service for some one else. It was completely 100% her idea. In fact I tried to talk her out of it. I didn't feel like. It wasn't the easiest timing.
Sometimes, in fact I feel like a LOT of times, service isn't convenient. But that isn't the point. In doing things for other people we are made better and hopefully they are helped too. Reminds me of two sayings. One is a little more polite than the other :)
“God does notice us, and he watches over us. But it is usually through another person that he meets our needs. Therefore, it is vital that we serve each other." - President Spencer W. Kimball
And "Service is like peeing your pants. Everyone can see what you've done, but only YOU can feel the warmth." :) HA!
Yep I know they were just cupcakes, but I am proud of Lucy for thinking of it and for insisting we do it. And hopefully all of them can start with cupcakes and continue on to helping in bigger ways as they age.
These lovely little cupcakes are a favorite. When you are tired of always making banana bread (although with this recipe I am not sure how that happens!) or just want to mix it up... try out these little beauties from Martha.
Ingredients
1 1/2 cups all-purpose flour, (spooned and leveled)
3/4 cup sugar
1 teaspoon baking powder
1/2 teaspoon baking soda
1/4 teaspoon salt
1/2 cup (1 stick) unsalted butter, melted
1 1/2 cups mashed bananas (about 4 ripe bananas), plus 1 whole banana, for garnish (optional)
2 large eggs
1/2 teaspoon pure vanilla extract
Honey-Cinnamon Frosting

Directions:
Preheat oven to 350 degrees. Line a standard 12-cup muffin pan with paper liners. In a medium bowl, whisk together flour, sugar, baking powder, baking soda, and salt.
Make a well in center of flour mixture. In well, mix together butter, mashed bananas, eggs, and vanilla. Stir to incorporate flour mixture (do not overmix). Dividing evenly, spoon batter into muffin cups.
Bake until a toothpick inserted in center of a cupcake comes out clean, 25 to 30 minutes. Remove cupcakes from pan; cool completely on a wire rack. Spread tops with Honey-Cinnamon Frosting. Just before serving, peel and slice banana into rounds, and place one on each cupcake, if desired.
Honey-Cinnamon Frosting
1 1/4 cup confectioners' sugar
1/2 cup (1 stick) unsalted butter, room temperature
1 tablespoon honey
1/8 teaspoon ground cinnamon
Directions : In a medium bowl, using an electric mixer, beat confectioners' sugar, unsalted butter, honey, and ground cinnamon until smooth, 4 to 5 minutes.
Regan was on call, Eli had had a hard day and I was tired frankly. But she wanted to so badly. So we made some. And the kids watched me decorate them with the lovely Honey Cinnamon Frosting. They figured out how all three of them could have a beater (two with a beater each and one with a spoon. Lucy drew and wrote on a card for each of them and we all piled in the van. The first house no one was home so I just opened the door and set them inside (this is Raymond!) and the next house the kids (except Oliver :) ) all ran up and delivered them. They were all so happy to have done it.
Obviously them getting to eat the left over cupcakes that day and in their lunches the next couple days sweetened the deal. But what made me the most happy, and I think them too (especially Lucy), is that they did some service for some one else. It was completely 100% her idea. In fact I tried to talk her out of it. I didn't feel like. It wasn't the easiest timing.
Sometimes, in fact I feel like a LOT of times, service isn't convenient. But that isn't the point. In doing things for other people we are made better and hopefully they are helped too. Reminds me of two sayings. One is a little more polite than the other :)
“God does notice us, and he watches over us. But it is usually through another person that he meets our needs. Therefore, it is vital that we serve each other." - President Spencer W. Kimball
And "Service is like peeing your pants. Everyone can see what you've done, but only YOU can feel the warmth." :) HA!
Yep I know they were just cupcakes, but I am proud of Lucy for thinking of it and for insisting we do it. And hopefully all of them can start with cupcakes and continue on to helping in bigger ways as they age.
These lovely little cupcakes are a favorite. When you are tired of always making banana bread (although with this recipe I am not sure how that happens!) or just want to mix it up... try out these little beauties from Martha.
Ingredients
1 1/2 cups all-purpose flour, (spooned and leveled)
3/4 cup sugar
1 teaspoon baking powder
1/2 teaspoon baking soda
1/4 teaspoon salt
1/2 cup (1 stick) unsalted butter, melted
1 1/2 cups mashed bananas (about 4 ripe bananas), plus 1 whole banana, for garnish (optional)
2 large eggs
1/2 teaspoon pure vanilla extract
Honey-Cinnamon Frosting
Directions:
Preheat oven to 350 degrees. Line a standard 12-cup muffin pan with paper liners. In a medium bowl, whisk together flour, sugar, baking powder, baking soda, and salt.
Make a well in center of flour mixture. In well, mix together butter, mashed bananas, eggs, and vanilla. Stir to incorporate flour mixture (do not overmix). Dividing evenly, spoon batter into muffin cups.
Bake until a toothpick inserted in center of a cupcake comes out clean, 25 to 30 minutes. Remove cupcakes from pan; cool completely on a wire rack. Spread tops with Honey-Cinnamon Frosting. Just before serving, peel and slice banana into rounds, and place one on each cupcake, if desired.
Honey-Cinnamon Frosting
1 1/4 cup confectioners' sugar
1/2 cup (1 stick) unsalted butter, room temperature
1 tablespoon honey
1/8 teaspoon ground cinnamon
Directions : In a medium bowl, using an electric mixer, beat confectioners' sugar, unsalted butter, honey, and ground cinnamon until smooth, 4 to 5 minutes.
Wednesday, April 18, 2012
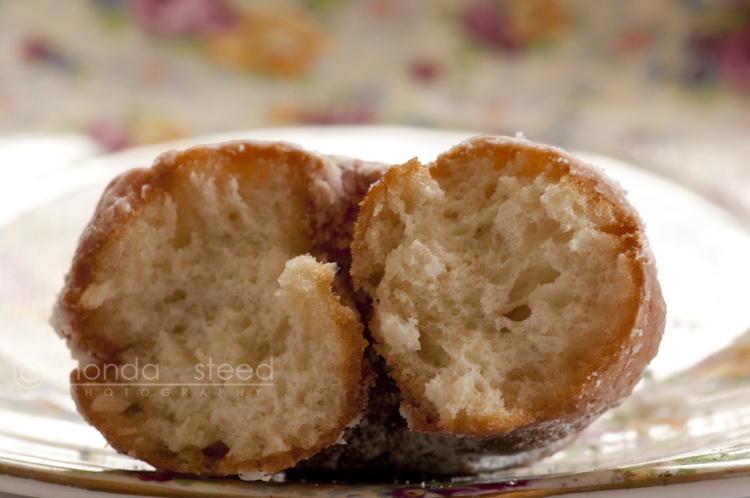
In the Kitchen: Grandma's Buttermilk Donuts
There are two kinds of donuts in my life. My mom's yeast donuts and these.
My Grandma's Buttermilk donuts.
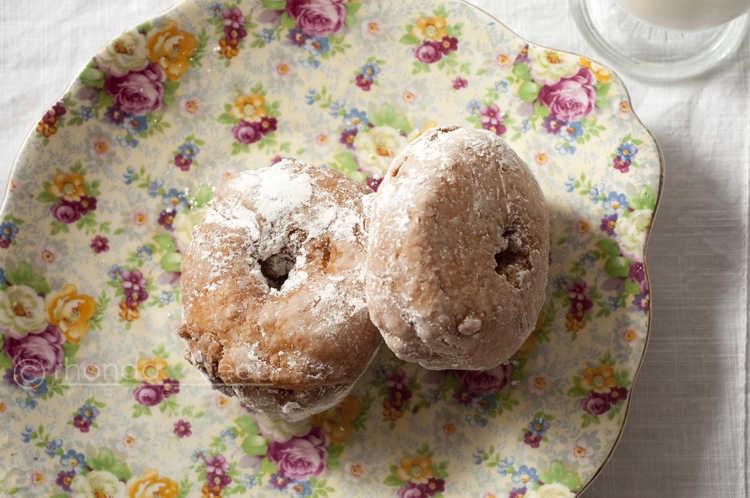
A lovely cake crumb interior with a golden brown coating. Cooled and rolled in icing sugar is my favorite way to eat them!
Grandma's Buttermilk Donuts
2 cups white sugar
5 Tbsp Crisco (grandma says these do NOT work with a substitute!)
5 medium sized eggs
1 tsp salt
1 Tbsp vanilla
2 cup buttermilk
2 cup milk
2 tsp baking powder
2 tsp baking soda
Flour
Beat sugar, Crisco, vanilla and eggs with an electric mixer until frothy. Add salt, buttermilk, milk, baking powder, baking soda and flour. Add enough flour to make a soft dough. Roll and cut into doughnuts. Fry in hot oil until golden brown. Makes 41 doughnuts depending on how you roll the dough.
And yep... no measuring for the flour... this is straight out of Grandma's cookbook that I posted about here.
My Grandma's Buttermilk donuts.
A lovely cake crumb interior with a golden brown coating. Cooled and rolled in icing sugar is my favorite way to eat them!
Grandma's Buttermilk Donuts
2 cups white sugar
5 Tbsp Crisco (grandma says these do NOT work with a substitute!)
5 medium sized eggs
1 tsp salt
1 Tbsp vanilla
2 cup buttermilk
2 cup milk
2 tsp baking powder
2 tsp baking soda
Flour
Beat sugar, Crisco, vanilla and eggs with an electric mixer until frothy. Add salt, buttermilk, milk, baking powder, baking soda and flour. Add enough flour to make a soft dough. Roll and cut into doughnuts. Fry in hot oil until golden brown. Makes 41 doughnuts depending on how you roll the dough.
And yep... no measuring for the flour... this is straight out of Grandma's cookbook that I posted about here.
Monday, April 09, 2012
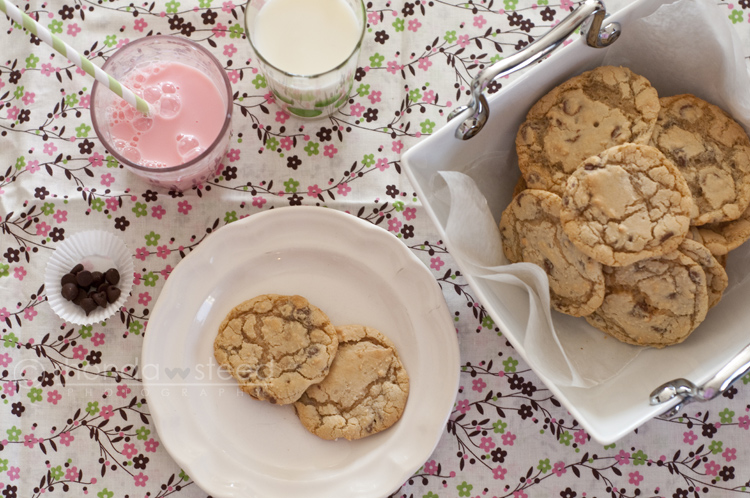
In the Kitchen: The BESTEST Chocolate Chip cookies
These are easily my favorite chocolate chip cookies.
If I make them and take them somewhere guaranteed someone will ask for the recipe!

Three important things about them:
1. Make SURE you only have Chipits Pure milk Chocolate chips. (I love substituting no name brands in recipes but in this one it won't fly!)
2. Do NOT overbake them. They are best when you take them out as soon as the edges just barely get brown.
3. You will eat a Lot of these. Soooo be prepared :)
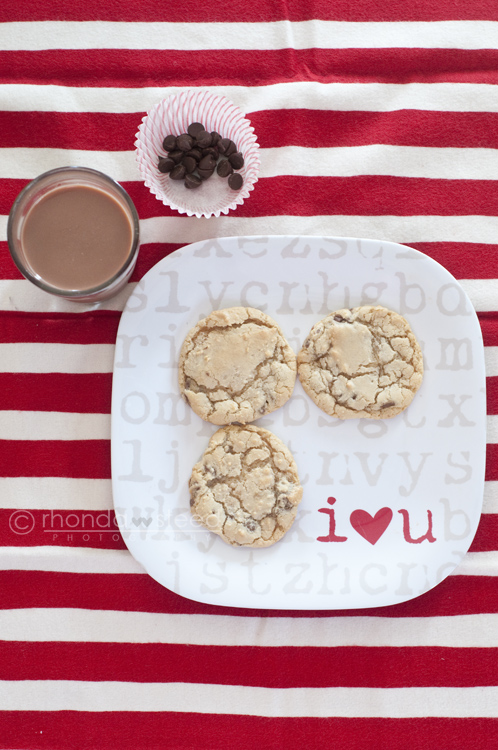
(It's true.... i love these cookies!)
Ingredients:
2/3 cup melted butter
2 cups lightly packed brown sugar
2 eggs
2 Tbsp hot water
2 2/3 cup all-purpose flour
1 tsp baking soda
1 tsp baking powder
1/4 tsp salt
1 package (270 g) Hershey' Chipits Milk Chocolate Chips
How to:
Beat the melted butter, brown sugar, eggs and hot water well. Stir in flour, baking powder, baking soda and salt. Add in chocolate chips. Drop with small spoon (or ice cream scoop) onto a ungreased cookie sheet. Bake at 375 F for 8 minutes. Makes 5 dozen cookies.
Try them. And you can thank me later.
PS. I've decided I love food photography. Hence the three photographs of ONE kind of cookie :) Ah the things that bring me pleasure!
PPS. After taking all these shots my kids and I ate a whole pile of these lovely cookies.
PPPS. I think it'd be fun to take pictures for a cookbook. Or a restaurant.
PPPPS. Which picture of the cookies is your favorite?
I'm linking up at these places:
i heart nap time, your talking too much, nifty thrifty, Under the table and dreaming, it's a hodge podge life, simply designing, 30 Handmade Days and Two Yellow Birds.
If I make them and take them somewhere guaranteed someone will ask for the recipe!
Three important things about them:
1. Make SURE you only have Chipits Pure milk Chocolate chips. (I love substituting no name brands in recipes but in this one it won't fly!)
2. Do NOT overbake them. They are best when you take them out as soon as the edges just barely get brown.
3. You will eat a Lot of these. Soooo be prepared :)
(It's true.... i love these cookies!)
Ingredients:
2/3 cup melted butter
2 cups lightly packed brown sugar
2 eggs
2 Tbsp hot water
2 2/3 cup all-purpose flour
1 tsp baking soda
1 tsp baking powder
1/4 tsp salt
1 package (270 g) Hershey' Chipits Milk Chocolate Chips
How to:
Beat the melted butter, brown sugar, eggs and hot water well. Stir in flour, baking powder, baking soda and salt. Add in chocolate chips. Drop with small spoon (or ice cream scoop) onto a ungreased cookie sheet. Bake at 375 F for 8 minutes. Makes 5 dozen cookies.
Try them. And you can thank me later.
PS. I've decided I love food photography. Hence the three photographs of ONE kind of cookie :) Ah the things that bring me pleasure!
PPS. After taking all these shots my kids and I ate a whole pile of these lovely cookies.
PPPS. I think it'd be fun to take pictures for a cookbook. Or a restaurant.
PPPPS. Which picture of the cookies is your favorite?
I'm linking up at these places:
i heart nap time, your talking too much, nifty thrifty, Under the table and dreaming, it's a hodge podge life, simply designing, 30 Handmade Days and Two Yellow Birds.
Subscribe to:
Posts (Atom)